Towards the end of 2022 I swapped two of our Prusas in the print farm out for a Voron 2.4R2 300mm LDO kit. Here’s my ownership experience to date.
With a Nevermore and two bed fans pre-heat time from 29deg ambient to 45deg chamber air temp at gantry level is 7 minutes.
Initial Build
The initial build used the following:
- Stock Omron probe
- Pins mod
- Rapido hotend
- Bondtech LGX Lite extruder
- Titanium gantry backers
- Kinematic bed mounts
- LDO 10mm thick bed – default for their 2.4R2 kits
- Separate 5V PSU for the Pi
- LDO Hartk breakout board
- Rama idlers
- Nevermore filter – standard with the LDO kit
The Octopus pin chart helped. After some tweaking via the tuning guide and then using the great PIF profiles I found I could get prints done in about 30% of the time it would take the Prusas, so I was very pleased.
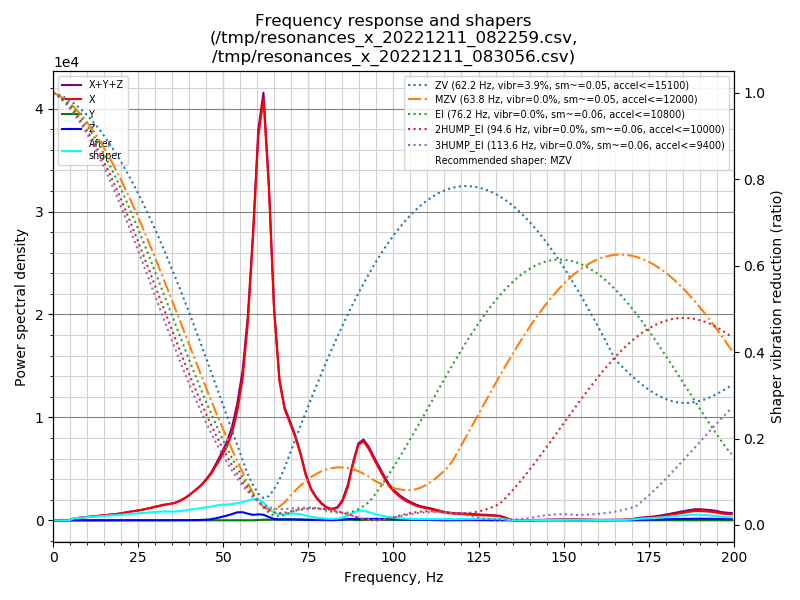
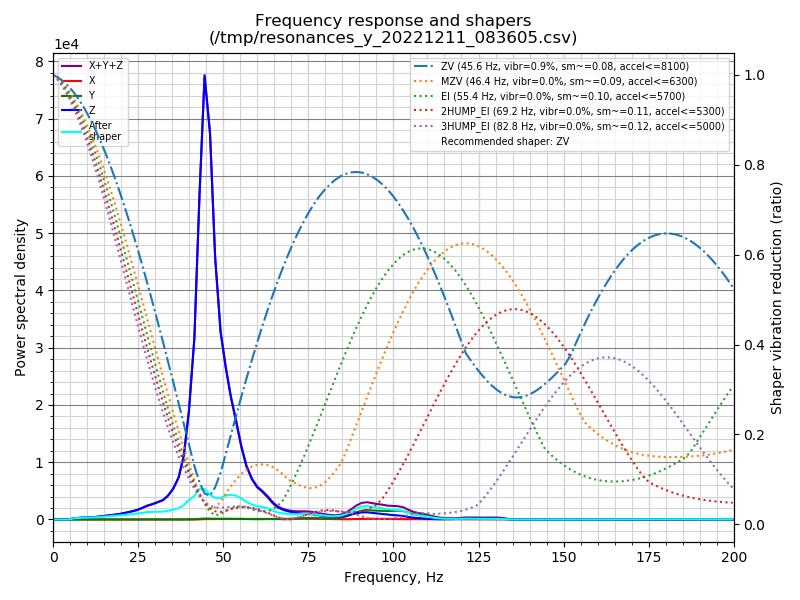
Initial resonance graphs:
390 hours
One of the hotend heater wires in the umbilical broke and I tore it all down to go CANbus, and make a few other changes while I was there:
- CANbus with EBB36, mounted to the LGX Lite with one of these mounts. Using this as a starting config.
- Umbilical
- Euclid, thanks to the EBB36 not having any 24v for the probe without mucking around
- BTT Smart Filament Sensor
- Twin fan exhaust setup
- X endstop relocated to toolhead – the stock STLs have a place for it. Hooked up to PB6
- Y endstop relocated to rear gantry using these STLs
- FAN1/PE5 became the new exhaust fan header.
- Moved to a 12V PWM fan until the 24v ones arrive – FAN0/PE8 became the new hotend fan header.
- STOP0/PG6 became the tacho pin for the hotend fan.
- Hotend thermistor on PA3
24v fan arrived – it’s now on FAN1/PA0 with the tacho wire on PB7 NOTE:NOW PB5 @1763 hours. I went with the OD4010-24HB01A – 9.2 CFM (0.258m³/min) airflow and 0.200 in H2O (49.8 Pa) static pressure. 1.45W, ball bearing, 33.4dB.
530 hours
The Voron was taken offline briefly to install Noctua 60mm fans in place of the GDStime fans. They only move half as much air at 3k RPM but the GDStime fans were running at 60% power anyway – and the Noctua fans are vastly quieter. Jumper set to 12v for them.
Also replaced the USB cable between the Raspberry Pi and the Octopus MCU to see if it makes a difference to an odd issue (sporadic stuttering).
- Noctua front right fan – PD15, RPM pin PG13
- Noctua rear right fan – PD14, RPM pin PG12
- LED strip was moved to PA8
- Filter fan is now on PD12
The hotend RPM monitoring has paid off once already – a loose piece of filament was sucked into the hotend fan hub which jammed it. Ellis’ macros worked perfectly and the I received a Telegram message, print paused so I could remove the jam and the print was then able to continue. The Telegram aspect isn’t part of Ellis’ scripts, it’s from the Moonraker Telegram plugin.
550 hours
Frustrated with variable first layer squish, I installed the Klipper Z calibration plugin from here. It still varies by a frustrating degree so I am left with replacing the Z endstop switch to see whether that is the culprit or ditching the kinematic bed mounts (the bed shifts with <600gm force applied so won’t work with TAP unless something is modified) and going TAP. I have a kit on the way for that, and some Chainflex cable arrived too for the umbilical. There’s an odd problem where the toolhead pauses mid-movement randomly throughout the print and I’ll be interested to see whether that’s resolved with better wiring.
I figured out how to set up a Git backup of the config files… then found there’s a tutorial on that out there. Oh well!
714 hours
- Tap probe – PB9 for signal
- X Endstop – PB8/GND
- 2010 fan for EBB36 – PB3 for tacho pin
- Moved to Igus Chainflex CF140.07.04.UL (4 cores, 18AWG, screened, 8.5mm OD, PVC sheath – it was what was available in an appropriate length) for the umbilical
- Accidentally bought 16mm cable glands rather than 12mm so the standard STLs had to be modified
- Modified the A/B mount from here to take a 16mm thread and endstop. I was looking at this one but the other is a bit higher and allows for a bump stop on the right side of the gantry to be extended and thus adjust the rear trigger point.
- Pi camera installed using this mount.
- Printed these magnet panels to try.
Post-Tap the resonance graphs were not great on one axis…
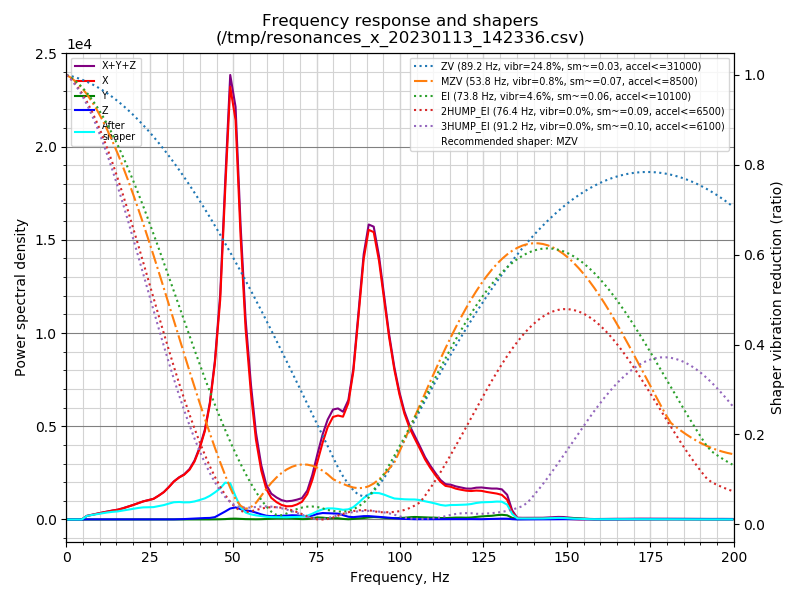
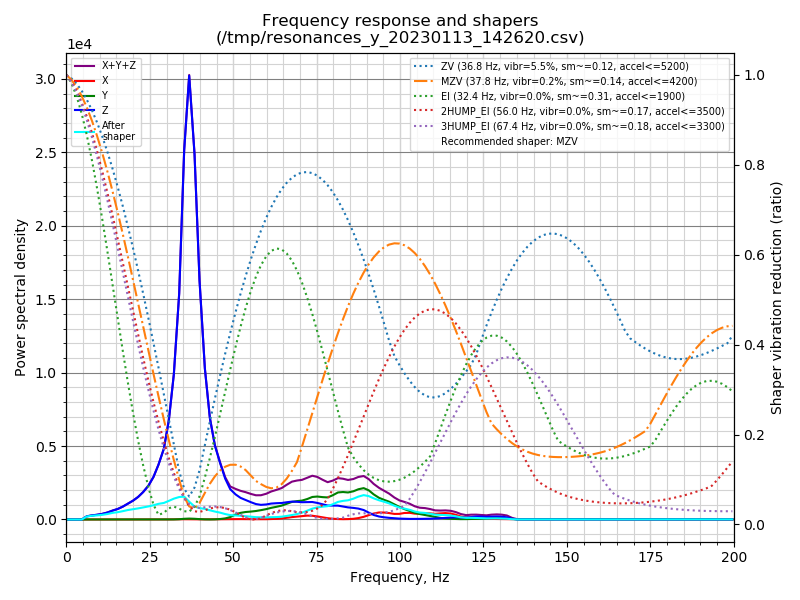
Turns out I had reinstalled the Stealthburner incorrectly and the lower bolts weren’t actually in the heatset inserts. Fixed that, and:
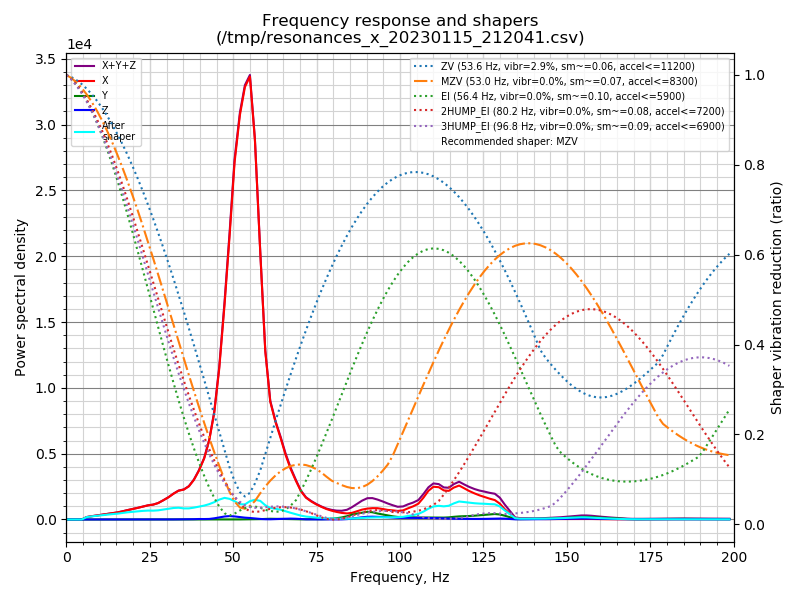
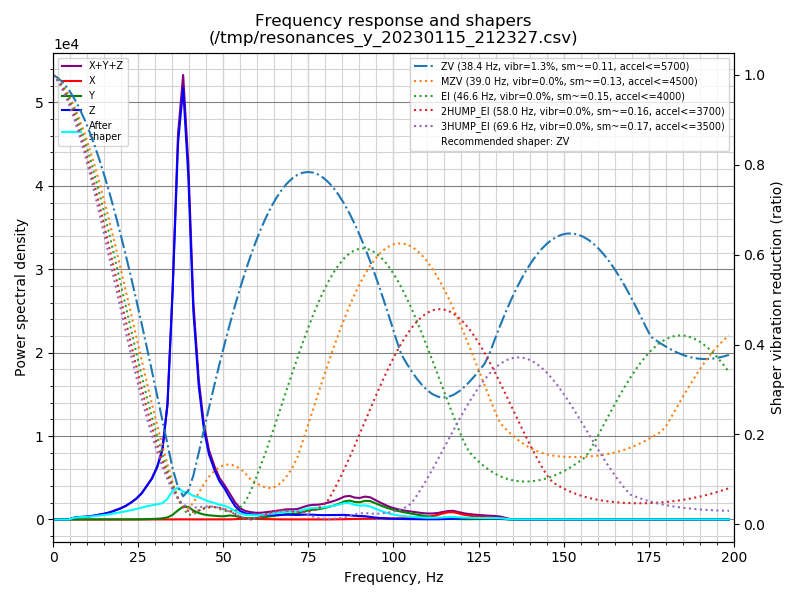
So… MZV went from 15k to 11k on X and ZV went from 8100 to 5700. I didn’t have to change profiles to accomodate that – still using a slightly modified Ellis’ PIF profile.
753 hours
- Added Klipper Adaptive Meshing (not the purging part)
- Tap probe – fantastic results, very reliable so far and excellent first layer consistency
774 hours
Got the profiles dialed in (Pressure Advance via Ellis’ tool here) and the Voron is back to churning out products without any babying with stellar quality and at triple the rate of the Prusa Mk3S+/Bear frame/Bondtech BMG units we have. Very pleased with the output.
At this point the printer has put through 7,534.7 meters of PLA – about 22.65kg, or about 700gm a day.
860 hours
The belts were riding up and down post-Tap install – this was fixed by tweaking the Rama idler screws slightly which caused the belts to track true.
1032 hours
The original 0.4mm Phaetus plated copper nozzle was partially occluded so I swapped it out for a generic 0.4mm brass nozzle. Took less than 60 seconds and the printer was back in business. 10,548m of filament or approx. 31.72kg – 737gm a day.
1188 hours
I found the Fast Gyroid Infill github page which promises much faster gyroid infill rates… it works as advertised. Very pleased with that. I also set up variables so that Klipper turns Nevermore off and turns on the exhaust fans for PLA, and the reverse for ABS. I tried this as an initial speed for SQV and it’s working well:
SET_INFILL_SQV SQV=20I also found reference on Reddit to the BTT filament runout sensor requiring large detection figures if it’s not solidly mounted, and mine is a little loose in the mount. So far I’m getting false runouts detected with detection figures of below about 100mm, which is far above the 7mm that it defaults to. Time to re-design the mount.
I also found the retraction calibration tool, which looks worth a try! I also found the Bondtech github with the newly released LGX LIte toolhead STLs.
1250 hours
Trying out these panel latches (6mm, to match 3mm foam + 3mm acrylic sheet) to make adding or removing panels easier. Not that I have had to do that for a while, but I’m sure it’ll make future maintenance easier.
Also printing this thermistor holding Z chain guide to add a chamber temp thermistor into.
Found a replacement LCD screen holder to replace the one I accidentally broke 1300 print hours ago here.
1763 hours
Got a fan RPM warning; the hotend fan was recording 0rpm despite spinning. Changed sensor ports to PB5 and it’s working again. No idea why PB7 stopped working. Took about twenty minutes to sort. While the printer was offline I checked my cabling for the Raspberry Pi camera and it was fine, so that isn’t why the camera doesn’t work… I ran raspi-config and enabled the camera, will reboot and see if that fixes it.
Update: Checked the crowsnest logs and saw “Error 127 occured on line 31” – ran sudo make install in ~/crowsnest/ and that fixed it right up after it installed a missing dependency. Using this camera mount with success.
Next time I have the back apart I’m going to put the Z chain underneath using this.
2021 hours
Enabled stealthchop on the Z motors to see if I can reduce the noise coming from them. X/Y are basically silent, where Z can be heard through two walls… will see how it goes. Longest print 19 hours 20 mins, ~23km/69kg of filament put through so far.
2084 hours
Stealthchop has cut down the noise substantially and there appears to be zero effect on print quality, so that’s a win. The BigTreeTech filament sensor had a scrap piece of filament jam it tonight which meant I had to pause a print, take the back off and clear it. Found a resonance holder here – may try that to help improve the graphs.
2485 hours
Changed nozzle for another cheap brass one. Wasn’t the problem. Printed fine at low flow rates. Had a look at the Capricorn tubing in the hotend and it has gone from 1.95mm ID to 2.15mm… which probably wasn’t the issue. Replaced it anyway.
2564 hours
Quite a few upgrades. I couldn’t figure out why the can0 network was refusing to come up, until I realised that I had not yet flashed Klipper onto the Octopus and that’s required before can0 appears.
- EBB36 replaced
- X/Y motors upgraded
- Bed thermistor replaced
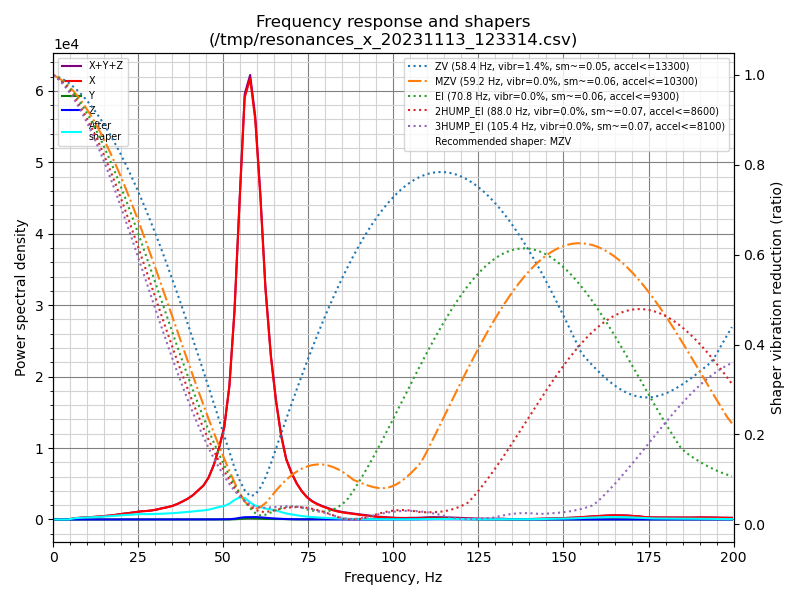
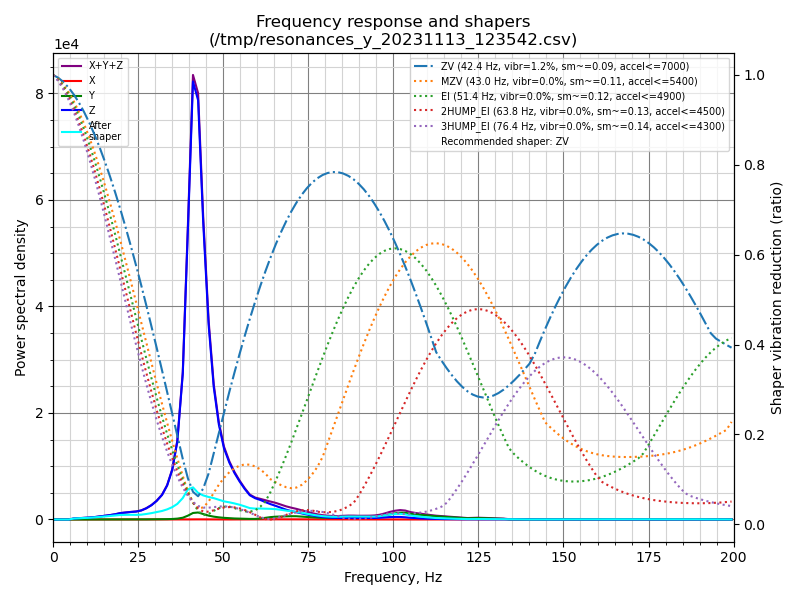
New resonance graphs:
Auto speed:
AUTO SPEED found maximum acceleration after 188.85s
| X max: 89687
| Y max: 38640
| DIAG X max: 23171
| DIAG Y max: 22140
Recommended values:
| X max: 71750
| Y max: 30912
| DIAG X max: 18537
| DIAG Y max: 17712
Recommended acceleration: 17712
AUTO SPEED found recommended acceleration and velocity after 437.47s
| X max: a71750 v1380
| Y max: a30912 v503
| DIAG X max: a18537 v374
| DIAG Y max: a17712 v384
Recommended accel: 17712
Recommended velocity: 374
13:20
AUTO SPEED found maximum velocity after 248.61s
| X max: 1725
| Y max: 629
| DIAG X max: 468
| DIAG Y max: 480
3144 hours
When changing filament a piece jammed in the hotend and I had to take the nozzle off to push it out from below – I changed the nozzle for a fresh one since I already had it off.
3994 hours
An old file server was decommissioned which had a higher-CFM fan than the one that was being used in the 300’s exhaust and I wanted to see whether it would further reduce the printing fumes that leaked out of the enclosure. The existing exhaust fan was a Noctua NF-P12 Redux 1700rpm unit that moved 120m^3 per hour and had 2.83mm H20 static pressure. The replacement fan is a Noctua NF-F12 which has 186m^3/hour and 7.63mm H20 static pressure. I set up hardware PWM via Klipper and it works well.
Chamber temps have dropped from 60deg to 59deg with the same ambient (in both instances the exhaust fans are at 100%) and there is a noticeable reduction in smell – it wasn’t bad before, but it’s imperceptible now.
While I was doing that I changed the Raspberry Pi’s power delivery from the GPIO pins to a USB-C connector (with power/ground wires going into wagos).
The top panel was replaced with 6mm polycarbonate to stop it sagging as much.
4538 hours
Both 2.4s threw a “timing too close” error on the same morning and would not print. One was showing a low voltage warning; I turned the voltage up from 5.05 to 5.15V and the errors went away and both are now printing fine again.
Why did they both do that on the one morning when they’re on separate UPS units and running different versions of Klipper? No idea, but it’s a strange coincidence.
4643 hours
The filament tension screw backed out over time enough that under-extrusion was occurring in some instances; a half turn fixed it.
4824 hours
Took the printer offline to swap Tap for Beacon and Stealthburner for XOL. Changes
- Raspberry Pi 5 with Raspbian Lite 64-bit OS
- Beacon probe
- Vitalii3D Super Lightweight Carriage
- XOL toolhead
- 2x GDSTime 4010 12000rpm Mini Blower parts fans
- Delta ASB02505SHA-AY6B hotend fan – 4.3cfm, tacho wire, 25x10mm
- Nitehawk36 board
- Updated the rear exhaust mount to allow for the USB cable to come in from the vent
- Replaced the X rail with a CPC unit
Observations: One of my regular 4 hr 31min prints now takes 3 hrs 18 mins. I’m impressed by the speed bump for some profiles, for others it’s not as noticeable but still faster. Beacon is a revelation after the inductive probe/Klicky/Tap – it’s more consistent than the already-consistent Tap and so, so much faster at QGL/meshing/probing.
I have started recording how many seconds from the print being uploaded to the purge line being printed; from dead cold (10deg bed/ambient) at 70% bed power for PLA it’s about 330 seconds, from a warm bed ~10 mins post-print it’s 170-180 seconds.
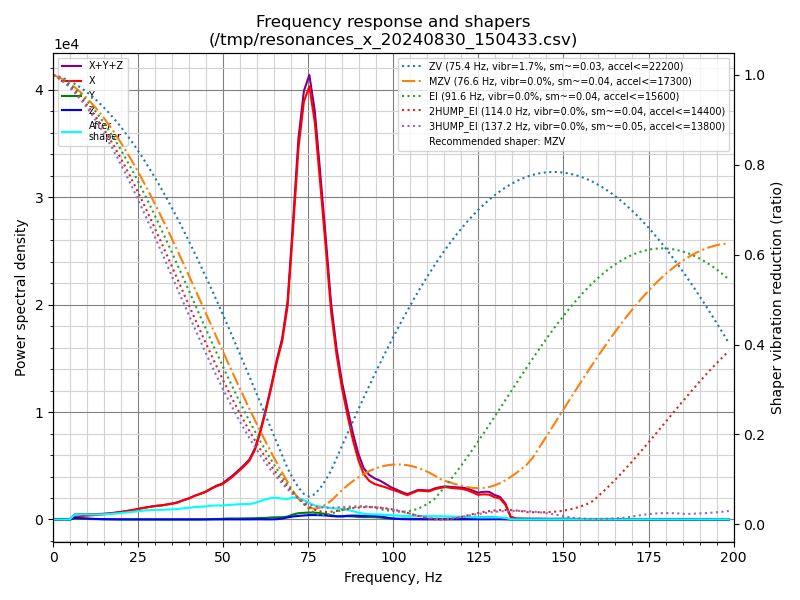
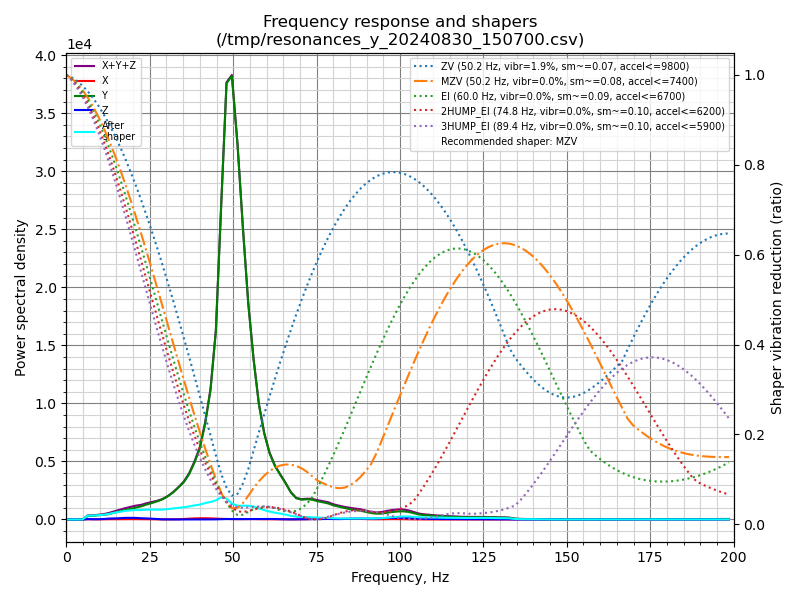
New charts:
4881 hours (57+4824)
Tuning just about done – almost back in production.
With the bed at 70% power (more and it trips the UPS):
20deg bed temp and ambient – 21 mins to reach 45deg chamber temp
25 deg bed temp and ambient – 17 minutes to reach 45deg chamber temp
55deg bed temp after having cooled from 105bed/65 chamber – 6 mins to reach 45 deg chamber temp
100% power:
23deg ambient/24deg bed/Chamber 27deg -> Chamber 45deg: 12 mins
Had a stepper over temp warning, turned the Z run_current down from 1.2 to 1.
4927 hours
I wasn’t hitting the flow rates I was expecting while tuning and thought I’d replace the brass nozzle with a fresh 0.4mm one to make sure I wasn’t chasing problems that could be explained by a partially blocked nozzle. 1,783 hours on the old nozzle.
Installed this filter monitor plugin.
Bumped the X/Y stepper voltage to 1.2A and moved to a TMC2240 for the two of them pursuing quieter running; they’re definitely quieter. I installed this stepper cooling fan mount over the Octopus – had to shorten the legs 3mm or so and use BHCS bolts to prevent the fans from fouling the bottom panel. One of the eight heatset insert holes is also a different size than the others which I only noticed after printing… so one fan is only held in with three bolts at this stage. That’s a problem for later. The fans are two OD4010-24HB01A units repurposed from the Stealthburner’s hotend fan. The fans are keeping the 2240s to 84C for the X and 93C for the Y at 60% power (to keep the fan noise down).
Tuning results – max speed was 700mm/s (limited to 600 in the config) and 30,000 accels (limited to 22,500 in the config).
5109 hours
Installed the very good bowden tube guide by Galvanic.
5520 hours
Moved to a 0.5mm Bondtech CHT nozzle. Easily hitting 34mm^3/s where previously I was at 25mm^3/s with the regular 0.4.
6081 hours
Moved to a 0.5mm Bozzle tungsten carbide nozzle. Pleased with it so far.
6361 hours
Did something thoughtless and snapped one of the XOL mounts; time to replace it with A4T.
At the same time;
- Replaced the RS-35-5 with RS-75-5
- Replaced the LRS-200-24 with the UHP-200-24
- Replaced the SFS2.0 with the Orbiter filament sensor
- Replaced Xol with A4T
- Replaced VZ-Hextrudort-Low with Orbiter 2.5
- Replaced the NH36 board with the v.1.4 NH36 board
- Replaced the PTFE tube going to the toolhead
- Replaced the Rama idlers with CNC BFI for 9mm belts
- Replaced the printed XY joints with CNC units for 9mm belts
- Replaced the CNC AB drives with ones suited to 9mm belts
- Replaced the 6mm belts with 9mm GT3 belts
- Replaced the XY motors with long shaft 2504s and added thermistors
- Added Vitalii3d’s XY motor dual shear bearing mount
- Replaced all of the gantry bearings
- Added 10mm adhesive foam insulation to rear panel
- Replaced three of the four RBPB5 bearing mounts with 25mm bolts not 22mm to accommodate the 9mm CNC items
- Added a USB hub to accomodate all the USB items
I meant to re-lube all the bearings but ran out of time before the printer had to be back in action… that’s going to have to be done separately.
Input shaping graphs after moving from 6mm GT2 to GT3 9mm belts are not remarkably different on X, a little better accel-wise on Y:
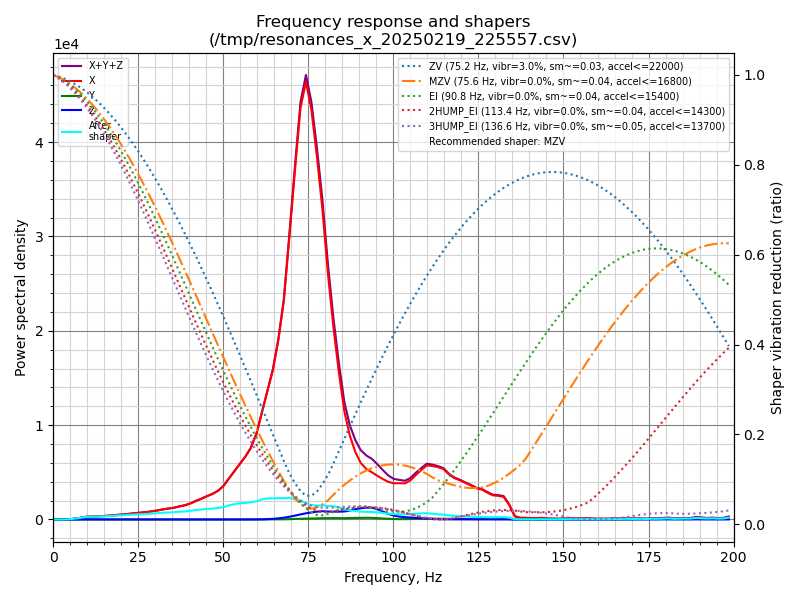
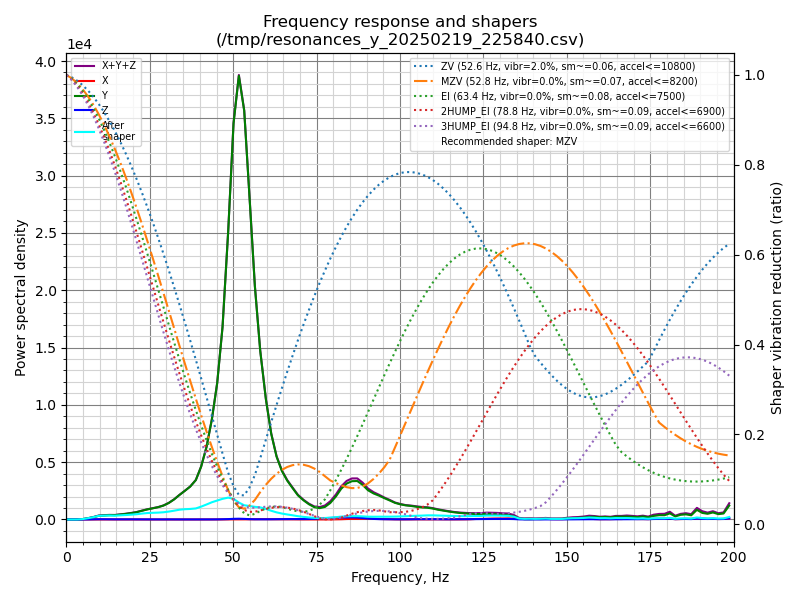
I have double checked the bolts on the gantry and toolhead – I don’t care for the second peak on both the X and Y graphs, I’d like to chase down why that’s occurring.
I’m running the Orbiter extruder motor at 0.65a as it runs at 0.85a fine for PLA but overheats in a 65deg chamber at the latter amperage.
6629 hours
Had a MCU disconnect error for the Nitehawk; found that the connector had wiggled a bit over 0.5mm loose over time, despite there being 4 cable ties holding it in place. I do prefer the latching EBB36 connector, but oh well.
Plugged back in and back in business.
6973 hours
Swapped back to a 0.4mm nozzle.
7115 hours
The Nitehawk36 MCU disconnect error became persistent; swapped it out for a spare and the issue resolved. I forgot to move the probe jumper and the magic smoke came out of the Orbiter filament sensor, so that had to be replaced.